How To Clean A Fiberglass Shower With No Effort In 2024
Learning how to clean a fiberglass shower requires no extensive knowledge or expensive cleaning tools. You won’t even break a sweat, trust me. The job is surprisingly quick and easy, and it costs you next to nothing.
Besides stains, fiberglass is also exposed to several problems, namely streaks, mold, and so on. Some will make you gross-out, spoiling your shower experience, but some can be pretty hazardous to your health.
How To Clean A Fiberglass Shower? A Quick Guide
In short, a fiberglass shower has several benefits, but most people frown upon one major drawback: it gets dirty easily. Yet, you will be glad to know that cleaning it is also effortless.
For a general cleaning, you will follow the steps below:
- Mix white vinegar with dish soap or shampoo in a spray bottle.
- Spray on the entire area and wait for about 15 minutes.
- Use a soft brush to scrub fiberglass and rinse until clean.
I can guarantee that your fiberglass shower will return to its glory in no time.
An Insight Into Fiberglass Shower
A fiberglass shower is made of polyester resin combined with woven glass fibers. The exterior is coated with a gel layer to make it look shiny and less susceptible to fading. This type of shower is one of the best alternatives for the following reasons.
Overall, a fiberglass shower is reasonably cheap, easy to install, and requires little maintenance, not to mention that it offers impressive durability and longevity. However, when put into perspective, it is inferior to an acrylic shower.
Acrylic is nonporous, which means that it can retain heat better, ensuring that your bath time is always satisfying. It comes in various designs and colors, whereas fiberglass is mainly available in basic white with very little texture.
Fiberglass is more prone to damage than acrylic. If you accidentally drop something on it, the chances are that it will crack. Signs of wear like scratching or fading on fiberglass are also more visible, and indeed, keeping its curb appeal will require regular cleaning.
A Fiberglass Shower’s Signs Of The Times
Over time, your fiberglass shower will become dirty. Below are what you will see when it’s in its wilderness years.
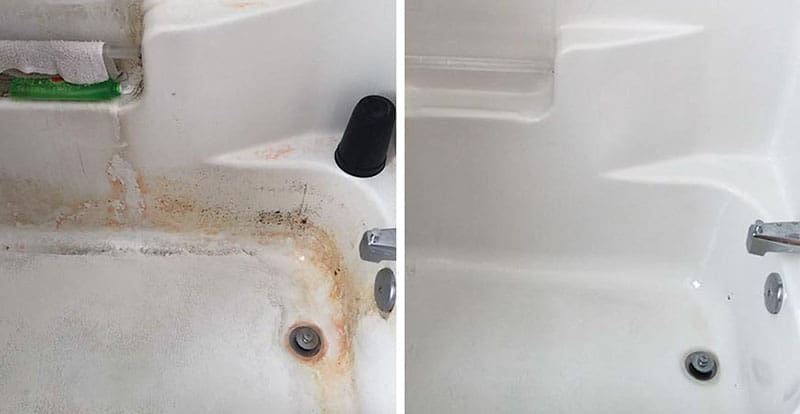
Rust Stains
Stains are common, but they are more frequent on fiberglass. They are caused by bacteria with a high iron content or when coming into contact with water. Luckily, the problem is an easy fix.
Scuff Marks And Streaks
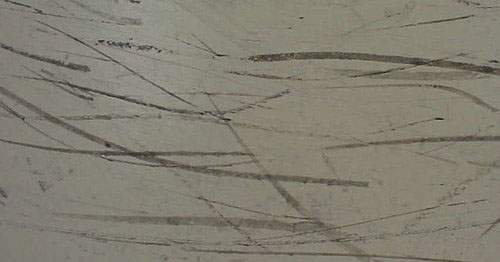
Soap and hard water buildup can cause those unattractive scuff marks and streaks on the surface. Contrary to popular opinion, abrasive cleaners won’t do the job – they only cause further damage to the fiberglass.
Mildew And Mold
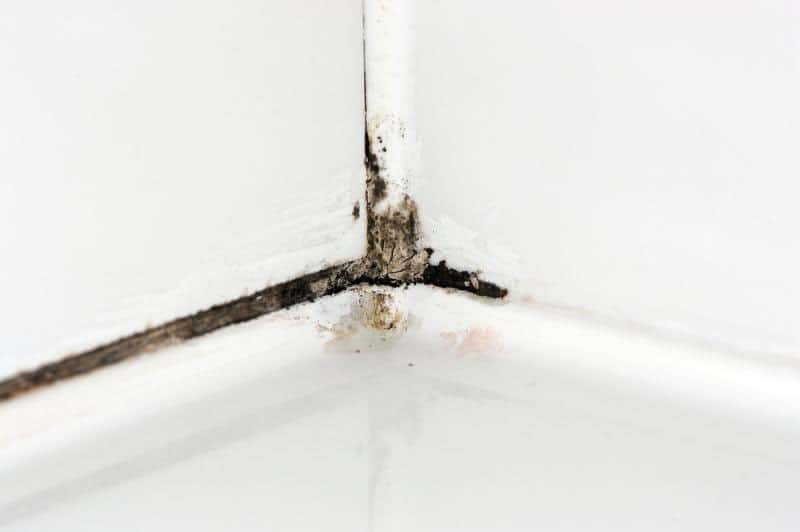
Another issue that your fiberglass shower may suffer from is mold and mildew spores. If they are given the proper conditions, they will become visible and grow at a quicker rate. Not only do they ruin your beautiful shower, but they are also detrimental to your health.
Soap Scum
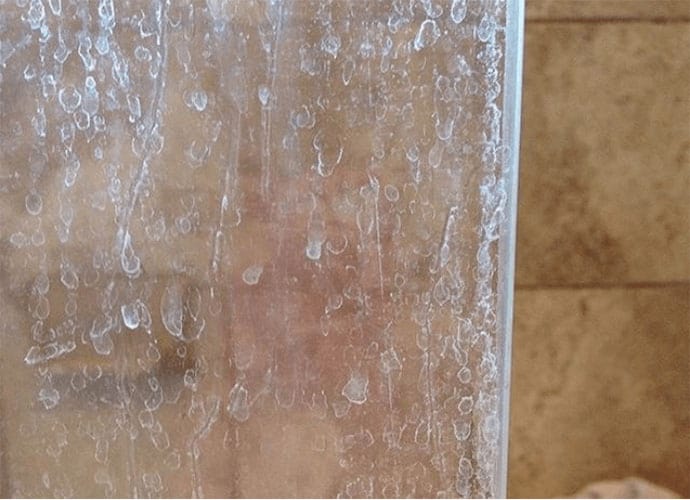
Since soap has a greasy oil base, the removal process is challenging. Soap scum is created by a chemical reaction between grime and water-borne minerals, resulting in thick puddles and pills. The longer you leave, the less likely they come off.
Limescale
Limescale is a chalky substance typically found in the showerhead, but you can expect to see it on shower doors. Similar to soap scum, limescale is difficult to remove, but if you have the right cleaner at your disposal, it will be out of your sight.
Discoloration
No matter how careful you use your fiberglass shower, discoloration is inevitable. From the pristine white color, the surface will turn dull yellow. While this is inherent, dyes from soaps or mineral deposits are proven to facilitate the process.
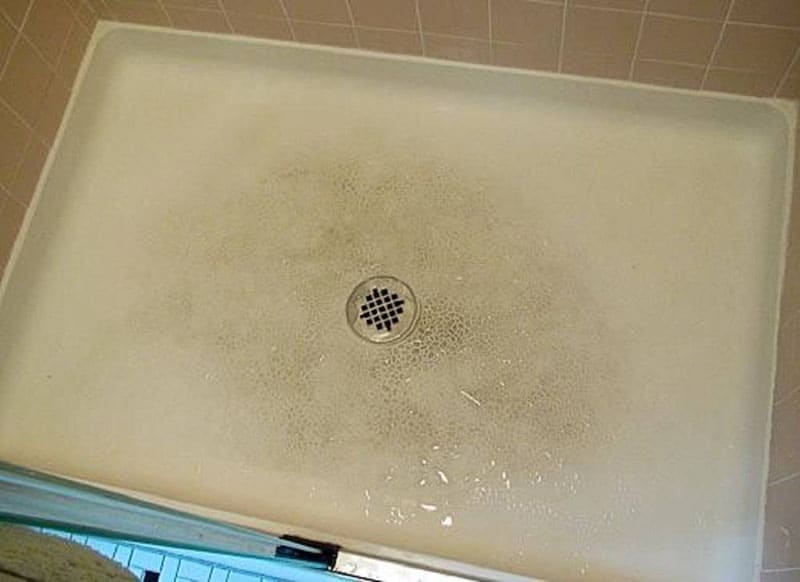
If such nuisances are happening to your bathtub shower, keep reading to find the solution.
Restoring Your Fiberglass Shower’s Look
Ignoring your dirty fiberglass shower only makes matters worse, so it’s time you got down to business. Forget all those store-bought cleaners if you are planning to get one. In this post, I’ll be dealing with natural cleaning solutions only. Fewer chemicals, less damage!
Before cleaning, it’s crucial to keep the area spacious to maneuver easily. Declutter soap, bottles, or any personal stuff out of the shower area. You may want to remove the shower curtain as well.
Next, rinse the area to get rid of the loose dirt and debris. Open the window or turn on an electric fan to ventilate the room. This will help prevent fumes and moisture. The pre-work is done.
General Cleaning
If it’s just regular maintenance, you only need dish soap or shampoo to make it look neat as a pin.
What You Need
- White vinegar
- Dish soap or shampoo
- Spray bottle
- Soft brush, sponge, or cloth rag
How You Do It
Step 1: Combine white vinegar with dish soap or shampoo and pour the mixture into the spray bottle (ratio 3:1).
Step 2: Spray the surface and wait for 15-20 minutes.
Step 3: Use a soft brush or other alternatives to work on the solution. Then, rinse off with water. The point of using dish soap here is to prevent the vinegar from evaporating quickly.
Note: The recommended amount of dish soap and shampoo for the mixture is ⅓ cup. If you use more than this amount, it will be strenuous to clean the surface thoroughly. You can also microwave vinegar for about 30 seconds to make the solution more effective.
Watch this video to know more:
Deep Cleaning
The following deep-cleaning methods will grapple with the problems mentioned in the previous section.
1. Remove Rust Stains
Option 1
With most basic rust stains, this method works wonders – thanks to baking soda!
Rust stains are not so difficult to remove. Grab the following tools , and I’ll show you the way!
What You Need
- Baking soda
- Nylon brush
- Sponge
- Cloth rag (optional)
- Acetone (optional)
Step 1: Wet the stains and apply baking soda to them.
Step 2: Scrub the stains using the nylon brush until a paste is formed. You will need to wet the brush beforehand. Do it gently; otherwise, you will scratch the surface.
Step 3: Let the paste sit for an hour and before rinsing off with the sponge.
Step 4: If the stains are not completely removed, dampen the cloth rag with acetone and continue rubbing the remaining rust traces.
Step 5: Rinse the whole fiberglass surface and let it dry. No more rust stains!
Option 2
If the baking soda trick did not help, move on to this technique using lemon juice. All the rust stains will disappear in a snap.
- Dish soap
- Sponge
- Lemon juice
- Borax
- Scouring powder
- Peroxide
- Cream of tartar
- Rubber gloves
Step 1: Combine dish soap with water. With a wet sponge, clean the surface using the solution.
Step 2: Since you will be working with mild acid at this point, it is recommended that you put on a pair of rubber gloves.
Step 3: You will create a paste made with borax and lemon juice to dissolve rust. Let the paste sit on the stains and rinse off once hardened.
Step 4: Next, you will mix up another paste to eradicate the stains. The formula consists of half a cup of scouring powder, one cup of peroxide, and half a cup of cream tartar.
Step 5: Again, apply the paste to the stains and rinse off after half an hour. Keep your gloves on all the time until you have finished the job.
2. Remove Scuff Marks And Streaks
As I have mentioned, abrasive cleaners are not meant to remove scuff marks and streaks on fiberglass. What should you use instead?
- Baking soda
- All-purpose bathroom cleaner
- Sponge
Step 1: Wipe the entire surface with water.
Step 2: Gently scrub the surface with the bathroom cleaner and a damp sponge.
Step 3: Combine water and baking soda to create a cleaning paste. Apply the paste on the scuff marks and streaks.
Step 4: After an hour, rinse the paste and let the surface dry. All those scuff marks and streaks are now gone!
3. Clean Mildew And Mold
Don’t ever let mold grow. It will cause several health issues, namely skin rashes, irritated eyes, coughing, or even respiratory illnesses.
Option 1
Hydrogen peroxide is known for treating skin infection, but you can also use the compound to clean fiberglass.
- 3% hydrogen peroxide
- Sponge or cloth rag
- Cotton ball or paper towel
Step 1: Pour the peroxide on affected areas.
Step 2: Gently scrape mildew off the surface.
Step 3: If it takes too long to come off, place cotton balls or paper towels soaked with hydrogen peroxide on mildew spots. Leave them for a few minutes before returning to step 2.
Option 2
Beware that the next option will call for bleach, a chemical cleaner that can ruin the resin layer if not diluted properly.
- Soft brush
- Bleach
- Baking soda or fiberglass cleaner
- Sponge
Step 1: Dampen mold and mildew with water. This will help reduce the mold dust as you remove it.
Step 2: Scrape off the mold with a soft brush.
Step 3: Mix bleach with warm water (ratio 1:4) and apply the solution to the mold spots.
Step 4: Rinse the surface after 15-20 minutes.
Step 5: Continue cleaning the surface with baking soda or a fiberglass cleaner. Read and follow the instructions carefully if you opt for the second choice.
Step 6: Use the sponge to remove any dirt, soap, or grime residue that facilitates mold’s growth in the future. Rinse the surface and watch it glow.
4. Dissolve Soap Scum
Don’t let ugly soap scum ruin your shower experience. It can be anywhere, from shower curtains, shower doors, and more.
Option 1
This cleaning solution is gentle and does the least damage to fiberglass. It works perfectly for light scum and can be used for weekly cleaning.
- Vinegar
- Dish detergent
- Spray bottle
- Stiff-bristled brush
Step 1: Dilute vinegar with water as a 1:1 ratio, then add a tablespoon of dish detergent.
Step 2: Strain the solution into the bottle and spray generously on fiberglass.
Step 3: With a stiff-bristle brush, scrub the surface to remove all the scum. Finish the job with a quick rinsing.
Option 2
The quicker you deal with soap cum, the easier it is to remove. Act fast, or you’ll regret it!
- Cloth rag
- Baking soda
- Paper towel or soft brush
- Spray bottle
- Vinegar or hydrogen peroxide
- Paste wax (Optional)
Step 1: Dampen the cloth rag with warm water and wipe the entire surface to eliminate loose dirt.
Step 2: Like previous methods, you will mix baking soda with water to form a paste.
Step 3: Spread the paste on soap scum with a paper towel or a soft brush. Let it stand for 10-15 minutes.
Step 4: Fill the spray bottle with vinegar. Spritz the vinegar on soap scum with the paste on. For heavy scum, you can switch vinegar with hydrogen peroxide.
Step 5: After a few minutes, wipe soap scum off with the rag. It should come off without any problem. If it refuses to, repeat the process.
Step 6: Clean the surface with fresh water and let it dry.
Step 7: To prevent new soap scum from appearing, you can coat the surface with paste wax.
Option 3
This alternative particularly works with soap scum building up on your bathroom fittings.
- Vinegar
- Plastic bag
- Rubber band or string
Step 1: Fill the plastic bag with vinegar.
Step 2: Fasten the bag to fixtures covered with soap scum.
Step 3: Remove the bag after a few hours. Squeaky clean!
Option 4
With tougher stains, you may need to turn to borax for help.
- Borax
- Lemon juice
- Microfiber cloth
Step 1: Mix up a paste using borax and lemon juice.
Step 2: Apply the mixture on stubborn scum.
Step 3: Wipe the surface with a microfiber cloth. All the scum is now gone for good!
5. Get Rid Of Limescale
Fortunately, limescale can be removed within just minutes. What’s the miracle? Mild acid it is.
Option 1
When speaking of high acidity and amazing cleaning performance, lemon juice is sure to spring to your mind first.
- Lemon juice
- Spray bottle
- Soft brush or sponge
- Old toothbrush (optional)
Step 1: Fill the spray bottle with half a cup of lemon juice and half a cup of hot water.
Step 2: Spray limescale stains with the solution and let it sit for at least an hour.
Step 3: With a soft brush or a sponge, lightly scrub the surface to avoid scratches. Use an old toothbrush to deal with stubborn spots.
Step 4: Rinse the surface. All the limescale has magically vanished.
Option 2
Here’s an alternative for lemon juice: baking soda and white vinegar. Together, they form a potent cleaning paste that is super effective in removing heavy limescale.
- White vinegar
- Spray bottle
- Baking soda
- Soft brush or sponge
Step 1: Spray limescale stains generously with white vinegar.
Step 2: Allow it to sit for at least half an hour. Spray every 15 minutes again, keeping the fiberglass surface wet.
Step 3: Apply baking soda to the damp stains.
Step 4: Similarly, scrub the stains with a brush or a sponge. Be gentle to prevent fiberglass from scratching. If needed, sprinkle more baking soda.
Step 5: Rinse off the vinegar and baking soda. The surface should be squeaky clean by now.
6. Treat Discolored Fiberglass
You’ll be surprised by how effective this home remedy is. Note that this technique won’t work if the surface is in its old age. Your last resort is to stop by the nearest hardware store and buy a refinishing kit.
If the yellow color is not uniform, there’s a high possibility that you are dealing with hard water stains instead. Besides grime or mineral deposits, some stains are the result of dye or pigment. Below are some cleaners that will bring fiberglass back to life:
- All-purpose bathroom cleaner: mix it with water and clean the surface with a sponge or soft brush.
- Detergent: apply the same technique as you’d use with a bathroom cleaner.
- Baking soda and water: make a paste like previous methods. Apply the paste using a sponge or plastic applicator.
- White vinegar: spray on stained or discolored areas.
- Acetone: the solvent can deal with the most stubborn pigment and dye stains on the surface.
For dark stains (usually in black or brown) caused by algae or mineral buildup, hydrogen peroxide is the top-notch solution. Dampen a cloth rag with the peroxide and wipe the surface until the stains come off. Rinse thoroughly with water.
Sometimes, fiberglass is naturally discolored due to hard water deposits. Spraying the surface with vinegar is the best solution since it contains acetic acid, which is great for cleaning minerals. Let it sit for an hour, spray more if needed, and rinse when done.
Note: To prevent run-off and evaporation, you can mix it with borax or a little baking soda.
Quick Tips, Long-Lasting Impacts
You will wish that you knew these brilliant tips sooner. Well, I guess it’s not too late now!
- Heat the surface with hot or lukewarm water before cleaning: when contacting heat and vapor, caked-on dirt will soften, making it more straightforward to wipe off the surface.
- Dry the surface after cleaning and showering: water is one of the culprits that cause many of the issues mentioned in this post. Thus, keep the surface dry as frequently as possible by squeegeeing the surface with terry cloth.
- Chemical cleaners should be your last resort: stick to mild, natural cleaners suggested to reduce damage risk.
- Use truck degreaser if you have it: truck degreaser is an effective cleaner for vehicles, but you can also use it on your fiberglass shower.
- Avoid mixing commercial products: some chemical products can cause a reaction, leading to toxic or even explosive outcomes.
- Abrasive pads are a big no: steel wool, scouring, or wire brushes are too harsh for fiberglass. A soft nylon brush is a better option.
- Safety first: when working with solvents like acetone, it’s essential to keep your gloves on all the time. Wearing goggles is also an excellent idea to ensure that they won’t splash into your eyes.
By now, I’m positive that your fiberglass shower is sparkling with joy. Celebrate your handy work with a steamy shower and leave all your worries behind!
FAQs
The next section covers some of the most asked questions regarding cleaning a fiberglass shower and, of course, the answers you want. Don’t skip it!
No Stains, No Pain
Let me guess; you probably regret not learning how to clean a fiberglass shower earlier, right? If you know someone struggling with similar problems, don’t hesitate to show that person this post. They can’t thank you enough.
Hopefully, you find this post helpful, and all the illustrations provided have made everything plain sailing for you. Should you have additional questions regarding cleaning up your fiberglass shower, comment below, and I promise to respond as quickly as possible.
